Ashlar-Vellum IKEv2 VPN Setup Guide

This guide will help you connect to the Ashlar-Vellum IKEv2 VPN service. This VPN is designed to tunnel traffic for Ashlar-Vellum licensing services, primarily when your current network restricts direct access. The licensing services reside within the 69.13.42.128/25 network range.
Important Context:
Less than 1% of Ashlar-Vellum customers need to temporarily use this VPN service. It is intended as a short-term solution while you work with your IT department or Internet Service Provider (ISP) to unblock normal access to Ashlar-Vellum's licensing servers.
When to Use This VPN:
The Ashlar-Vellum software needs to contact our licensing servers at specific times:
- When a new serial number and registration code is first entered.
- Periodically, the software "lazily" tries to contact the licensing servers. If unsuccessful after some time, it may start to display warnings or complaints.
You typically only need to be connected to this VPN during these specific interactions. For example, connect to the VPN, enter your new serial/registration code, ensure the software is recognized, and then you can usually disconnect. If your software starts complaining about licensing, connect to the VPN for a few minutes until the complaint resolves, then you may disconnect again. This VPN is not required for continuous connection during software use.
Alternative Licensing Option: Hardware Key
If VPN solutions are not suitable for your environment, Ashlar-Vellum also offers a hardware key (dongle) option for software licensing. This uses CodeMeter technology from Wibu.com. Please note that this option may involve an additional cost. Contact support@ashlar.com or your sales representative for more details.
Important: This VPN uses split-tunneling. Only traffic intended for Ashlar-Vellum's specified network segment will go through the VPN. All your other internet traffic will use your normal internet connection.
Connecting on Windows 10 / 11 (Recommended Method)
For Windows users, we provide an installer package that will configure the VPN connection and necessary network routing automatically. **This is the easiest and strongly recommended method for Windows.**
Download the Ashlar-Vellum VPN Installer for Windows:
(Size: approx. 270 KB. This installer is code-signed by Ashlar-Vellum (Vellum Investment Partners, LLC))
- Download the Installer: Click the download link above to save the `AV-VPN25.exe` installer to your computer.
- Run the Installer: Locate the downloaded `AV-VPN25.exe` file and double-click it to run.
-
Windows SmartScreen / Security Warnings:
- If Windows SmartScreen appears saying "Windows protected your PC", click "More info", then verify the Publisher is "Vellum Investment Partners, LLC", and click "Run anyway".
- If any User Account Control (UAC) prompts appear asking for permission to make changes, click "Yes". (This installer needs to configure network settings.)
-
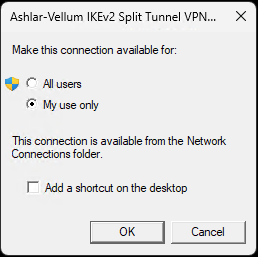
Installation Scope: You will be asked "Make this connection available for:".
- "All users": Select this option if you are an administrator and want to make this VPN connection available to all users on this computer. You will need administrator rights to complete this selection. Click OK.
- "My use only" (Default & Recommended for most users): Select this if you are the only person who will use this VPN on this computer. Click OK.
-
Connect to the VPN:
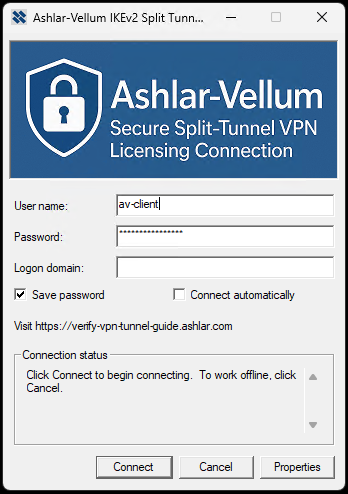
- Once installed, the VPN connection dialog may appear automatically, or you can find it in your Windows VPN settings list (usually named "Ashlar-Vellum IKEv2 Split Tunnel VPN 2025"). The icon for the connection may also appear in your system tray or network connections flyout.
- The connection dialog will display the Ashlar-Vellum branded graphic.
- User name: Enter
av-client - Password: Enter the password provided by Ashlar-Vellum Support.
- Logon domain: Leave this field BLANK.
- Check "Save password" if you want Windows to remember your password for future connections.
- It's recommended to leave "Connect automatically" UNCHECKED. Only connect when needed for licensing.
- Click **Connect**.
The installer configures all necessary settings, including network routing for Ashlar-Vellum services. Once connected, your Ashlar-Vellum software should function correctly. If you encounter issues, please contact support.
Note: This VPN installer has been tested on 64-bit versions of Windows 10 and Windows 11. If you are using a 32-bit version of Windows and encounter issues, please contact support.
Connecting on macOS (Catalina through Sequoia) (IKEv2)
The process for setting up an IKEv2 VPN is similar across recent macOS versions, but the user interface for System Preferences (older) versus System Settings (newer) and enabling the menu bar icon differs. For macOS, please use the manual setup instructions below using the VPN Connection Details provided further down this page.
-
Open Network Settings:
- macOS Monterey and earlier (Catalina, Big Sur, Monterey): Apple menu > System Preferences > Network.
- macOS Ventura and later (Ventura, Sonoma, Sequoia): Apple menu > System Settings > VPN (in the sidebar).
-
Add VPN Configuration:
- macOS Monterey and earlier: Click the "+" button in the Network preferences, select "VPN" for Interface, "IKEv2" for VPN Type, and give it a Service Name (e.g.,
Ashlar-Vellum IKEv2). Click Create. - macOS Ventura and later: In System Settings > VPN, click "Add VPN Configuration" and choose IKEv2.

- macOS Monterey and earlier: Click the "+" button in the Network preferences, select "VPN" for Interface, "IKEv2" for VPN Type, and give it a Service Name (e.g.,
-
Configure Connection Details: (Use details from the "Manual VPN Setup Details" section below)
- Display Name / Service Name: e.g.,
Ashlar-Vellum IKEv2(This may already be set if using older macOS). - Server Address:
verify-vpn-tunnel.ashlar.com - Remote ID:
verify-vpn-tunnel.ashlar.com - Local ID: Leave blank.
- Display Name / Service Name: e.g.,
-
Authentication Settings:
Click "Authentication Settings..." (older macOS) or look for the Authentication section (newer macOS).- Authentication type: Select Username (or similar, like "EAP").
- Username:
av-client - Password: (Enter the password provided by Ashlar-Vellum Support. You might be prompted for this when connecting or can enter it here if a field is available).

-
Enable Menu Bar Icon (for easy connect/disconnect):
macOS Monterey and earlier (Catalina, Big Sur, Monterey):
In the Network preferences window, with your new VPN connection selected, check the box labeled "Show VPN status in menu bar". Click Apply.
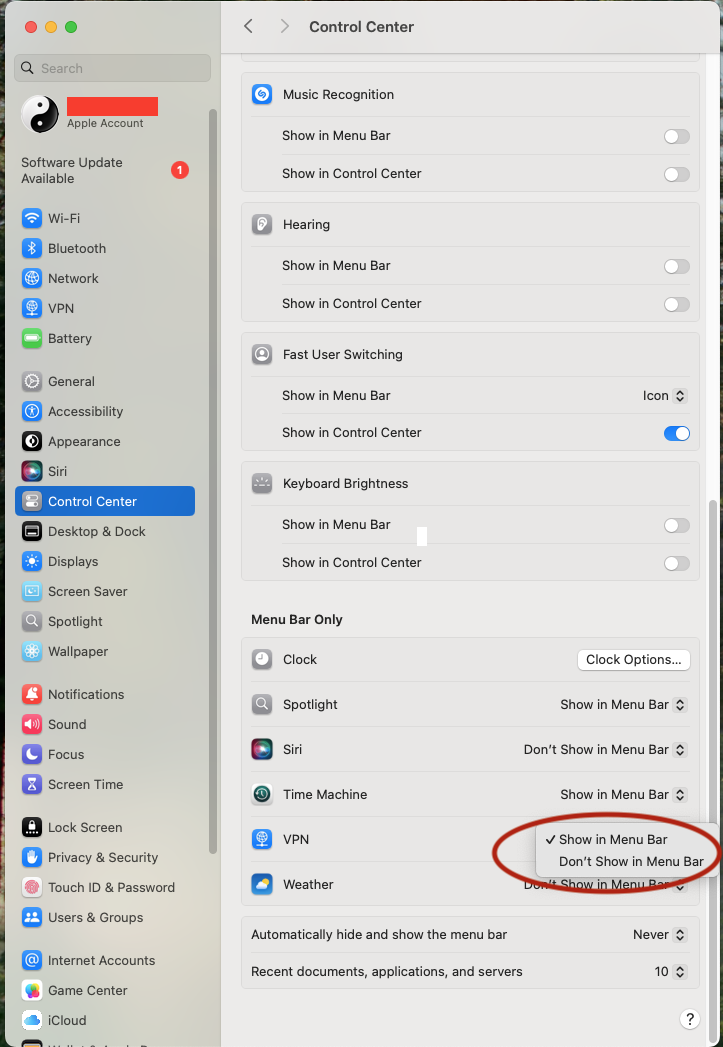
 macOS Ventura and later (Ventura, Sonoma, Sequoia):
Open System Settings > Control Center. Scroll down to "Other Modules" (or similar section) and find "VPN". From the dropdown next to VPN, choose "Show in Menu Bar". This will show the icon for any active VPN.
-
Connect:
- Use the VPN icon in the menu bar (if enabled in the previous step).
- Or, from the VPN settings page (System Settings or Network Preferences), select the VPN and click "Connect" or toggle the switch.
Manual VPN Setup Details (Primarily for macOS & Other Non-Windows Systems)
For Windows users, we strongly recommend using the installer package provided above. The following details are for manual configuration on macOS (as described in its section) or other operating systems that support IKEv2, or for advanced users troubleshooting.
- Server Address / VPN Server:
verify-vpn-tunnel.ashlar.com - VPN Type: IKEv2
- Authentication Method: EAP (Username and Password)
- Account Name / Username:
av-client - Password: Please contact support@ashlar.com to obtain the password.
- Remote ID (if asked):
verify-vpn-tunnel.ashlar.com - Local ID (if asked): Leave blank
Troubleshooting
- Cannot Connect / Authentication Fails (All Systems): Double-check all entered details: Server Address, Remote ID, Username, and especially the Password provided by support. Ensure they match exactly.
- Connection Issues / Server Not Responding (All Systems):
- Verify your internet connection is active.
- Check with your IT department to ensure VPN connections (specifically IKEv2, using UDP ports 500 and 4500) are not blocked by your company's firewall or network policies.
- Be aware that some public Wi-Fi networks (e.g., in hotels, airports, cafes) may restrict or block VPN connections. Sometimes, these networks offer a "premium" or "business" internet tier that allows VPNs; you may need to inquire with the provider.
- Windows Installer Note: If the Windows VPN Installer (`AV-VPN25.exe`) shows warnings from Windows SmartScreen or your antivirus, ensure the publisher is "Vellum Investment Partners, LLC" and choose to run it. If routing issues persist after installation (unlikely, but possible), please contact support.
- If you continue to experience problems after trying these steps, or if you are interested in the hardware key option, please contact support@ashlar.com.